Wednesday 18 November 2015

Create visual repersentation of DynamicsNAV data using Micorsoft Power BI

Hi,

Power BI is growing key asset in the Microsoft Dynamics Business solution. It is used by customers in all verticals to build BI and reports. To keep up with market demands, start your learning on Power BI!!!!

Start working with Power BI desktop version, click here to download.

Let us have a look how to use Microsoft Power BI Desktop version.

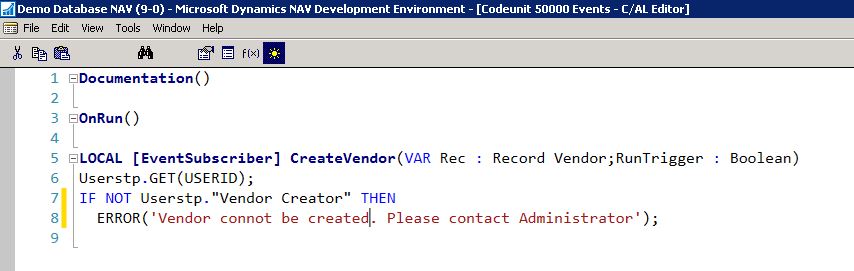
Follow the below step to extract data from Dynamics NAV using OData.


  • Download and follow the wizard to install Power BI.


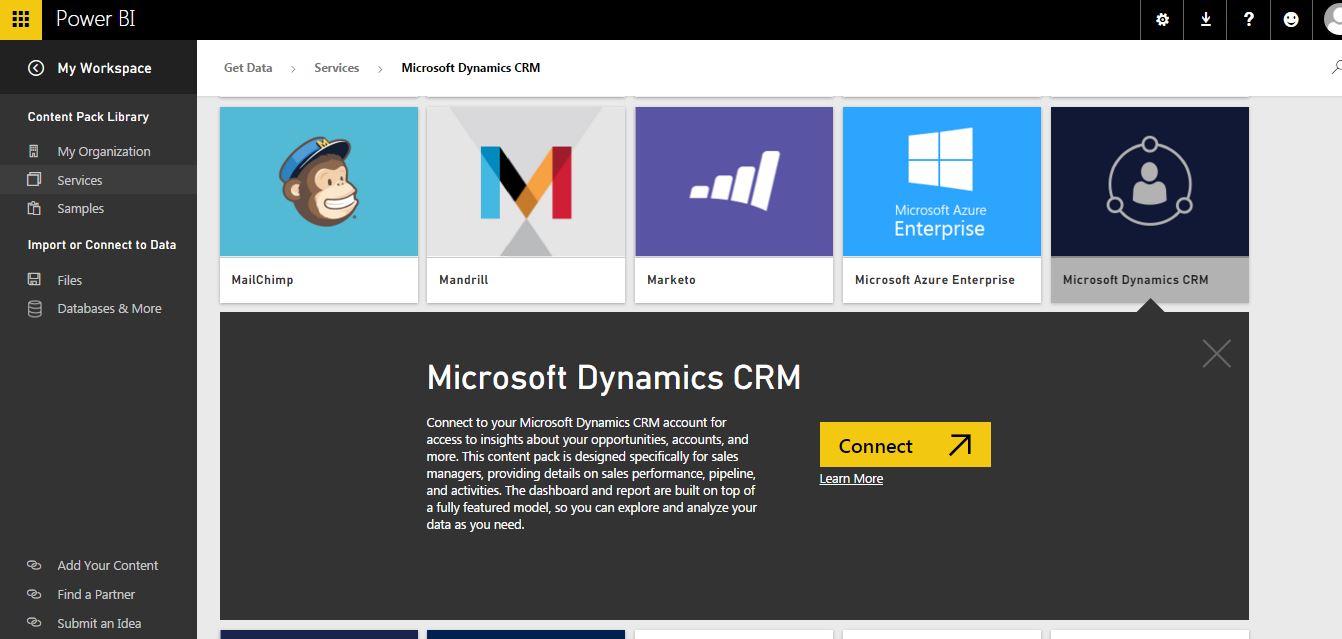
  • Open the Power BI installed on Desktop click on GET DATA >> Odata Feed.

  • Provide OData URL from NAV instance >> Web Services page. In current scenario I am taking 'Top Customers' OData URL from Web Services Page.
  • Click 'OK' once you provide credentials Power BI will load the data. Click 'Load' 

  • We can now see all the fields that are available for designing visuals.

  • Select the type of visual and respective fields. In this case I would like to see Sales by Country Region so choose both as shown below.
  •  

  • We can start designing our own visuals like below : Sale by Country, Sales by Sales Person, Sales by Customer Name etc...


  • Analyzing and filtering data is so simple like just click on the any one of the diagram it will auto filter the rest. For Example here I clicked on Germany Region in the first Visual which immediately highlights the related data on rest of the visuals.


  • We can save this visuals it will be saved with .pbxi file format and just click Refresh button on top ribbon every time you open to load the latest Data. 

    We can design wide range of visuals using Microsoft Power BI as shown below.


    That's how it works!!!

    Try installing Power BI and create you own visuals and start analyzing data.

    Cheers... 


    Monday 16 November 2015

    Working with NAVX in NAV 2016

    Hi,

    In my previous post we have seen how to generate NAVX file using Development Shell.

    Now let's have a look how to install and uninstall NAVX file across different instances. 

    Current NAVX file generated holds 2 changed objects (Page 26 & Table 23) and 2 new objects(New Table & CodeUnit).

    • Open Vendor Card of the new instance on which you are trying to install NAVX file. This instance doesn't have any changes on Vendor Card.

    •  Open NAV Developer shell of the new instance on which you want to install NAVApp.

    • Publish before you install NAVX. Run the below cmdlet.
      • Publish-NAVApp -ServerInstance DynamicsNav90 -Path D:\NAVEXT\Extension.navx

    • We can verify Version details by using cmdlet. 
      • Get-NAVAppInfo -ServerInstance DynamicsNav90


    • Install NAVX using cmdlet 
      • Install-NAVApp -ServerInstance DynamicsNav90 -Path D:\NAVEXT\Extension.navx


    Look at that all my customization are moved to new instance.

    • Uninstall App.
      • UnInstall-NAVApp -ServerInstance DynamicsNav90 -Path D:\NAVEXT\Extension.navx


    Now the "Approved Vendor" is removed.

    This is how Extensions work isn't that Great!!!

    Few things that i noticed

    • Extensions dosen't modify your Source code. Yes, you may not find the field or function that got added using Extensions from object designer.
    • Query cannot be deployed using Extensions.
    Lots of questions in my mind as well need to explore much more. 

    Anyways long way to go I will keep posting....

    Cheers :)

    Thursday 12 November 2015

    NAV 2016 Extensions

    Hi,

    In this post I would like to show you how NAV 2016 Extensions work!!!

    NAV 2016 has a new method of deploying the customization's without modifying source code by using Extensions.


    Extensions can be installed, upgraded, and uninstalled in an on-premises deployment, as well as for selected tenants in a multi-tenant deployment. 


    Let me first show you how to create an NAVX file.


    • Create 3 folders in any specified path as shown below.
    • Export all the base objects without any customization of NAV 2016 to the OriginalObj folder.
    • Let us assume that a customization is done in current NAVInstance1.
      • Added a Boolean filed on Vendor Table & Card Approve Vendor.
      • Added New CodeUnit(50000) and Table(50000).
    • Once done with customization export the all the objects of your current instance with modified objects to other folder ModifiedObj.

    • Open NAV Developer Shell


    • Here we can find few cmdlet commands,let us compare both Original & Modified object files exported. Use the below command.

      • Compare-NAVApplicationObject -OriginalPath <OriginalObj folder path> -ModifiedPath <ModifiedObj folder path> -DeltaPath <DeltaObj folder path> 


    • System will start comparing both the file and extract the differences as DELTA file into the given Delta folder.


    • This will do a quick compare and you see the changes once comparison is completed.


      • In my case as I said there are 2 new objects and 2 changed objects.

    • Open Delta folder and you can find Delta files created for changes found in comparison.
    • Now we need to generate an XML file which stores Version, Description and other details of the customization. Run the below cmdlet.
      • New-NAVAppManifest -Name "Extension Demo" -Publisher "Demo" -Version "1.0.0.0" | New-NAVAppManifestFile -Path D:\NAVEXT\Extensions.xml

    • This will generate an xml file with the Version details.
     

    • Now generate an NAVX file which will carry the customization done and it can be used to install and uninstall on the other instances of NAV 2016.
    • Run the below command
      • Get-NAVAppManifest -Path D:\NAVEXT\Extensions.xml | New-NAVAppPackage -SourcePath D:\NAVEXT\DeltaObjects -Path D:\NAVEXT\Extension.navx


    Now the whole customization is available in the single NAVX file format with which we can install, upgrade, and uninstall in an on-premises deployment, as well as for selected tenants in a multi-tenant deployment.


    In my next post I will elaborate how to Install and Uninstall NAVX file.

    Cheers.. :)


    Tuesday 10 November 2015

    Microsoft Power BI

    Hi,

    Why Power BI ?


    Power BI is a kind of tool for makeover of primitive data into profound and worthwhile information for business analysis. 

    Organization data can be renovated into rich visuals to accumulate and organize so you can concentrate on what matters to you.Stay in the know, spot trends as they happen, and drive your business further.

    Let us see how to use Power BI for Dynamics CRM.


    • Sign in with your Office365 account.

    • Click on Dynamics CRM icon and click >> Connect.

    • Power BI will request for Odata URL from your CRM instance.


    • Open you CRM instance goto >> Customizations >> Developer Resource >> Odata URL.

    • Provide the Odata URL and Login using oAuth2 by using your CRM credentials

    • Once done with authentication Power BI will try to load the data for CRM instance.


    • Here we have 3 different TABS 
      • Dashboards
      • Reports
      • Datasets
    • Microsoft by default would have done Dashboard & Reports setting like below.

    Dashboard

    Reports
    • We can still modify our Dashboard as we like.
    • We can also build our own custom reports from DataSets TAB.

    • Filtering data is much easier just click on diagram data related to the same will get filtered all over charts and highlights filtered data.

    Hope you find the post useful.

    Cheers.. :)
    •  


    Tuesday 3 November 2015

    NAV 2016 Events

    Hi,

    Many of would have already heard about the EVENTS in NAV2016 in this post let me show a simple example of how to use them.


    What are Events?


    C/AL programming is now made more flexible and effortless to upgrade, the programming concept of EVENTS has been introduced.

    EVENTS permits developers to add additional functionality without modifying the source code.


    Events in code level:

    • Business Events
    • Integration Events
    • System Events


    Events raised by the platform:

    • Table Trigger Events
    • Page Trigger Events


    In this post let me demonstrate Table Trigger Events.

    In Dynamics NAV 2016 every table will have the below events created by default once you create table.

    Table Level :                 
    • OnInsert                
    • OnDelete
    • OnRename
    • OnModify 
    Field Level :
    • OnAfterValidate
    • OnBeforeValidate


    Let us see how to use it with an example.

    Scenario : Vendor creation should be done only by specific USER in Dynamics NAV.

    • Create a CodeUnit 

    • Create a new function in the code unit.

    • Change the properties of the Function as below.

    • Now add a little bit of code here in the Function and save it.


    • Open the Vendor Card and try to create new vendor.
    • System will not allow you to create a new vendor.
    This is how events work. 

    Earlier we used to write code in the Triggers in which we used to modify source code. 

    But now with EVENTS we can avoid customizing base object to the maximum extend.

    This will make life easy for developers in merging objects, up-gradation etc...

    Cheers...