Friday 30 October 2015

Import Demo Data to Dynamics Ax 2012 R3.

Hi,

I know many of you are familiar with Demo data import, in this post I would like to share how to import Demo Data into AX2012 R3 and the issues that user may come across while importing.

Prerequisites :

  • Installed AX 2012 R3
  • Data Transfer tool installed (can download it from AX 2102 Test Data transfer Tool
  • Install MicrosoftDynamicsAXR3DemoDatav2 (Download from PartnerSource)
Steps to install :

  • Once the ZIP file is downloaded open it and run, you will find the Wizard
  • Provide the path for installation,


  • You can find the below files got created in the given folder.


Let us look how to import data.

Run the MicrosoftDynamicsAXR3DemoDatav2.exe file downloaded from partner source it will extract 3 types of files into the given Path.


You can see three types of files OUT, OUTMODEL & XML.


Steps to Import Data :


  • Open your AX instance and Import the MetadataXMLGenerator.Xpo file from Data Transfer Tool folder.


  • Compile the XPO file and run it

  • It will create Metadata file in the temporary folder.


  •  Copy and paste the Metadata file from Temp folder to [Lists] folder in Data Transfer Tool
  • Now open your CMD (command prompt) by right click >> Run as Administrator
    • Note : You may get error if you don't do this.

  • Direct the path of CMD to the folder where Data transfer tool is installed to file DP.exe 
  • Command should be 
    • DP.exe IMPORT <FolderPath(with the three types of file exported)> <AXInstanceName> <SQLSERVERINSTANCE>
  • Once you run the command system will
    start importing the data.


Data Imported successfully :)

Now let us check out the issues that we come across while importing.

Issue 1 : 


1) If command doesn't include or wrong AX instance is given.
2) If you don't run CMD as administrator.
3) If SQL server instance is not specified.
4) Any special characters in command then include whole command in "" shown below.


  • IMPORT "<FolderPath(with the three types of file exported)> <AXInstanceName> <SQLSERVERINSTANCE>".


  • DP.exe IMPORT <FolderPath(with the three types of file expoerted)> <AXInstanceName> <SQLSERVERINSTANCE>
Issue 2 :


It's due to network issue.


Yes, this issue occurs if your network path sharing is disabled.
Once you come across the error check if you are able to access network path of the folder, in your case just try to open run and check "\\<ServerName>\C$".
It throws an error saying "network path cannot be accessed".
now goto >> Services.msc >>Server  start the service.
now try to access you network path "\\<ServerName>\C$" if it works fine go ahead and run DP.exe .
Hope this will resolve the issue. 


Cheers...


Monday 19 October 2015

Power Pivot for Microsoft Dynamics CRM Online

Hi,

Power Pivot is an add-in for Microsoft Excel which actually is very "Power" full in analyzing data with millions of records from multiple data sources into a single Excel workbook, build PivotTables and PivotCharts, and then further analyze the data so that you can make timely business decisions.   

Before you read this post click on the below link for basic idea on how to use?


Power Pivot


Let us look at how to use Power Pivot for Microsoft Dynamics CRM..


  • Install Power Pivot and Power Query before you start working with Excel.
  • Once installation is done open excel you see the POWER PIVOT and POWER QUERY tabs as below.


  • Click on POWER QUERY >> From Other Source>> From OData Feed


  • Need to provide URL 


    • To get this URL Open CRM Instance
    • Click on Settings>>Customization>>Developer Resource


  • Provide URL click 'OK' system will prompt you asking for credentials in 'Organizational account' click save.


  • Navigator opens up asking to select Entity on which user want to create report. 'Select multiple'  and select entities click 'Load'


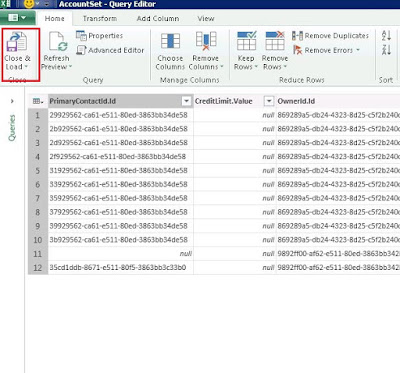
  • Excel will load the DATA SET we can now select the fields required on the report by Right Clicking on DATASET >> Edit.


  • Click on Close & Load.


  • Right click on AccountSet>>Load to. Data from Entity will be loaded on to Excel. Repeat same for OpportunitySet.


  • Now Click on tab Design>> Power View.


  • Excel will open the POWER VIEW 


  • Select the required fields in logical way. 
  • Here I want to see the Account wise sum of Estimated Revenues.
  • As soon as you add account form Account Entity and try adding Estimated Revenue system will ask you to provide relationship between Data sets.


  • Once relationship is created excel will check for the Account related Opportunities and create a Table as shown below.


  • Click on Tab 'BAR CHART' and select type of 'Bar Chart'


  • Bar Chart is created as below


  • We can filter data using 'Filters'.


  • Relationships and Power Pivot can also be done by POWERPIVOT>>Manage


  • Select 'Diagrams View'


  • Click on Pivot Table and create your report.


I am sure that user will love such reports!!!!


Cheers...


Wednesday 14 October 2015

CRM & NAV 2016 Custom table integration

Hi,

How to integrate Custom entity between NAV 2016 and CRM???

Follow the below steps :

1) I have a custom entity in CRM 'SIC Codes'.


2) Properties of CRM Entity are as below :


  • Entity Properties


  • Field Properties


3) Now create new table in NAV 2016 with below table properties.


  • Table Type = CRM
  • ExternalName as in CRM entity Name shown in step 2. 
4) Create new fields similar to fields  in CRM and change properties as below.
  • ExternalName as in CRM field Name.

5) Do the similar setting to all the required fields.
6) I created Page "Microsoft Dynamics CRM SIC Codes" for the same table and added the same to Menu Suite.


7) Click to open the Page 


Amazing!!! :D all the data in CRM Entity is now available NAV. 

Note : Data between NAV <-> CRM flows dynamically any record created in NAV or CRM will be immediately replicated in other application in no time.

One of the best Dynamics Integration's !!!

Cheers..  


Sunday 11 October 2015

MS Dynamcis Learning Portal

Hi,

Are you following Microsoft Dynamics Learning Portal ??

If not do it right now, it is an excellent resource pool for Dynamics consultants.


 Cheers... :)

Thursday 8 October 2015

Dynamics NAV 2016 integration with Dynamics CRM

Hi,

I would like to share something which has been newly added in Microsoft Dynamics NAV 2016.

Integration between NAV and CRM is now much more easy no need of connector or any extra coding.


How many of you identified the new Table property in NAV 2016?? :D

here it is take a look


"TableType :: CRM"  your next question, what it does ?(Check it in my next post)

In this post let me show you how native integration works.


1) Open NAV 2016 and type 'CRM SETUP' in the search bar


2) Open CRM setup form 

 in "Dynamics CRM URL :" enter the url from CRM instance


3) Open 'User Card' in NAV instance, CRM authenticates via Office 365, provide CRM user id for authentication.


4) Provide user id password and check "Enabled:"
    Click "Test Connection" to check if authenticates successfully.

System will auto fill remaining fields 


5)Goto Account in CRM

6)Open default 'CRM Account' Form  by searching 'CRM Account' in NAV search bar 


Wow awesome!!! look at that entire CRM account records replicated in NAV :D

no coding no connector amazing work done by Microsoft.

Check my next post to find out how to integrate custom entities in CRM with NAV!!! 

Cheers...